Whether you’re upgrading to Windows 11, reinstalling a corrupted system, or setting up a brand-new PC, Microsoft’s Media Creation Tool is one of the easiest ways to get the job done. Instead of searching for ISO files and figuring out boot settings on your own, this official tool guides you through the entire process in a simple, structured way.
The Windows 11 Media Creation Tool allows you to download the latest version of Windows directly from Microsoft and create a bootable USB drive or installation media in just a few clicks. It’s designed for regular users, not just technicians, which makes it a safe and reliable option when you need to install or repair Windows.
In this quick guide, you’ll learn what the Windows 11 Media Creation Tool is, when to use it, and how to use it correctly to upgrade or reinstall Windows without unnecessary confusion.
What Is the Windows 11 Media Creation Tool?
Before we jump into the step-by-step instructions, let’s make sure we understand what this tool actually is and why you might need it. The Windows 11 Media Creation Tool is a free utility provided directly by Microsoft that helps you download Windows 11 and create installation media.
Think of it as Microsoft’s official way of getting Windows 11 onto your computer or USB drive. Rather than buying a physical disc or relying on potentially sketchy download sites, the Media Creation Tool connects directly to Microsoft’s servers and downloads the genuine, official Windows 11 installation files.
The tool serves three primary purposes. First, it can upgrade your current Windows 10 or Windows 11 computer to the latest version of Windows 11. Second, it can create a bootable USB flash drive that you can use to install Windows 11 on any compatible computer. Third, it can download a Windows 11 ISO file, which is essentially a complete disk image of the operating system.
Here’s why this matters: having Windows 11 installation media gives you options. If your system becomes corrupted or unusable, you can use that USB drive to reinstall Windows cleanly. If you’re building a new PC or upgrading hardware, you’ve got Windows ready to install. For IT professionals or tech enthusiasts managing multiple computers, the Media Creation Tool creates a reliable, consistent installation source.
The tool is completely free, downloads directly from Microsoft, and is remarkably straightforward once you understand the process. Microsoft updates it regularly to ensure you’re always downloading the latest version of Windows 11 with all current security patches and features.
What You’ll Need Before Getting Started?
Proper preparation makes the entire process smoother and prevents frustrating surprises halfway through. Let’s gather everything you need before downloading or running the Media Creation Tool.
System Requirements
Your computer needs to meet certain minimum specifications to download and run the Media Creation Tool. You’ll need a computer running Windows 10 or Windows 11 with a stable internet connection. The tool itself is small (only a few megabytes), but it will download several gigabytes of Windows 11 installation files.
For storage requirements, make sure you have at least 8 GB of available space on your computer just for downloading the tool and temporary files. If you’re creating a bootable USB drive, you’ll need a USB flash drive with at least 8 GB capacity, though I strongly recommend using a 16 GB or larger drive to ensure sufficient space.
Your internet connection matters significantly here. The Windows 11 download is approximately 5-6 GB depending on the version. On a fast broadband connection, this takes 15-30 minutes. On slower connections, it could take several hours. Make sure you have a stable connection that won’t interrupt during the download.
Important Precautions and Preparations
If you’re creating a bootable USB drive, back up any data currently on that USB drive. The Media Creation Tool will completely erase everything on the USB drive during the creation process. This is not optional – all existing data will be permanently deleted.
Check your Windows 11 PC compatibility before proceeding. Windows 11 has specific hardware requirements including TPM 2.0, UEFI firmware, and Secure Boot capability. Microsoft provides a PC Health Check tool that verifies compatibility. Download and run this first if you’re uncertain whether your computer meets Windows 11 requirements.
If you’re planning to perform a clean installation rather than an upgrade, back up all your important files first. Clean installations erase everything on your computer. Even if you’re just creating installation media for future use, having recent backups is always smart practice.
Finally, ensure you have your Windows product key if you’re installing on a new computer or one that has never activated Windows 11 before. Many modern computers have digital licenses tied to their hardware, but it’s wise to have your product key documented just in case.
Step 1: Downloading the Windows 11 Media Creation Tool
Now let’s get started with the actual process. The first step is downloading the Media Creation Tool itself from Microsoft’s official website.
Open your web browser and navigate to Microsoft‘s official Windows 11 download page.
You must download from this official Microsoft page. Never download the Media Creation Tool from third-party websites, as these could contain malware or modified versions that compromise your security.
Locating the Download Section
Once the page loads, scroll down past the initial information sections. You’re looking for a section titled “Create Windows 11 Installation Media.” This section contains the actual Media Creation Tool download.
Under this heading, you’ll see a button labeled “Download Now” or “Download tool now.” The exact wording occasionally changes with website updates, but it’s always clearly labeled as the Media Creation Tool download.
Click the download button. Your browser will save a file called MediaCreationToolW11.exe to your Downloads folder. The file size is typically between 18-20 MB, so the download completes quickly even on modest internet connections.
Verifying Your Download
Once the download completes, navigate to your Downloads folder and locate the MediaCreationToolW11.exe file. Before running it, right-click the file and select “Properties.”
In the Properties window, look at the Digital Signatures tab. You should see a signature from “Microsoft Corporation” or “Microsoft Windows.” This verifies that the file is genuinely from Microsoft and hasn’t been tampered with.
If you don’t see a valid Microsoft signature, do not run the file. Delete it and download again from the official Microsoft website, ensuring you’re on the correct URL.
Step 2: Running the Media Creation Tool
With the tool downloaded and verified, it’s time to launch it and begin the actual Windows 11 media creation process.
Locate the MediaCreationToolW11.exe file in your Downloads folder. Double-click it to run the application.
Handling User Account Control
Windows will display a User Account Control (UAC) prompt asking “Do you want to allow this app to make changes to your device?” This is normal and expected for the Media Creation Tool since it needs administrative privileges to create bootable media.
Click “Yes” to grant permission. If you’re using a standard user account rather than an administrator account, you’ll need to enter administrator credentials at this point.
The Media Creation Tool window will open. You’ll see the Microsoft Windows 11 logo and a title bar saying “Windows 11 Setup.” The initial screen displays “Getting things ready” or “Preparing” with a spinning progress indicator.
The License Agreement Screen
After a few moments of preparation, the tool displays Microsoft’s license terms and conditions. This is the standard Windows 11 license agreement that governs your use of the operating system.
You’ll see several paragraphs of legal text describing the terms of use. At the bottom of the window, you’ll find two buttons: “Accept” and “Decline.”
To proceed, you must click “Accept.” If you click “Decline,” the tool closes immediately and no media creation occurs. There’s no way to proceed without accepting Microsoft’s license terms.
After clicking Accept, the tool moves to the next screen. You’ll see another brief “Getting things ready” message while the tool prepares the main options screen.
Step 3: Choosing Your Path (Upgrade or Create Media)
Now comes your first important decision: do you want to upgrade your current PC, or create installation media for use on a different computer?
The tool presents you with two clear options on the main screen:
Option 1: Upgrade this PC now
Option 2: Create installation media (USB flash drive, DVD, or ISO file) for another PC
Understanding the Upgrade Option
If you select “Upgrade this PC now,” the Media Creation Tool will download Windows 11 and immediately begin upgrading your current computer. This is the simplest path if you’re running Windows 10 and want to move to Windows 11, or if you’re already on Windows 11 but want to perform a repair installation or update to the latest version.
The upgrade process preserves your files, applications, and settings. It’s essentially a major Windows Update rather than a clean installation. Your personal data remains intact, and most applications continue working after the upgrade completes.
This option is appropriate when your current Windows installation works mostly fine but you want to move to Windows 11, or when you want to repair Windows 11 issues without losing your data.
Understanding the Create Media Option
If you select “Create installation media for another PC,” the tool will download Windows 11 and create either a bootable USB drive or an ISO file. This doesn’t affect your current computer at all – it simply creates installation media you can use later on any compatible Windows 11 computer.
This is the option you want if you’re preparing to install Windows 11 on a different computer, building a new PC, creating a backup installation drive, or preparing to perform a clean installation (which erases everything and installs Windows fresh).
Most users reading this guide will choose the “Create installation media” option because it provides maximum flexibility. You can create the media now and use it whenever needed, on whatever computer requires it.
Select your preferred option by clicking the radio button next to it, then click “Next” at the bottom of the window.
Step 4: Selecting Language, Edition, and Architecture
If you chose to create installation media, the next screen asks you to specify which version of Windows 11 you want to download. This determines the language, Windows edition, and system architecture of your installation media.
The Recommended Settings Checkbox
By default, you’ll see a checkbox marked “Use the recommended options for this PC.” When checked, this option automatically selects settings based on your current computer’s configuration.
The recommended settings will match your current system’s language, Windows 11 edition (Home or Pro), and architecture (64-bit). For most users, these recommendations are exactly what you want.
If the recommended settings suit your needs, simply leave the checkbox marked and click “Next” to proceed. The tool will use those settings and move forward.
Customizing Your Media Settings
If you need different settings than what your current PC uses, uncheck the “Use the recommended options for this PC” box. Three dropdown menus will become active, allowing you to customize your selections.
Language Selection:
Click the Language dropdown menu. You’ll see a comprehensive list of available languages for Windows 11. Scroll through to find your preferred language.
Common options include English (United States), English (United Kingdom), Spanish, French, German, Chinese, and dozens of other languages. Select the language you want for the Windows 11 installation.
Edition Selection:
Click the Edition dropdown menu. You’ll typically see two main options:
- Windows 11 Home: The standard edition for home users with all essential features
- Windows 11 Pro: The professional edition with additional features like BitLocker encryption, Remote Desktop, and domain joining capabilities
Choose the edition that matches your Windows 11 license. If you’re unsure, Home is the most common for personal computers, while Pro is typically used in business environments.
Architecture Selection:
Click the Architecture dropdown menu. For Windows 11, you’ll see:
- 64-bit (x64): This is the standard and only officially supported architecture for Windows 11
Unlike Windows 10, Windows 11 doesn’t support 32-bit systems. The dropdown might show only 64-bit, or it might show both but clearly indicate that Windows 11 requires 64-bit. Select the 64-bit option.
After making your selections, click “Next” at the bottom of the window to proceed.
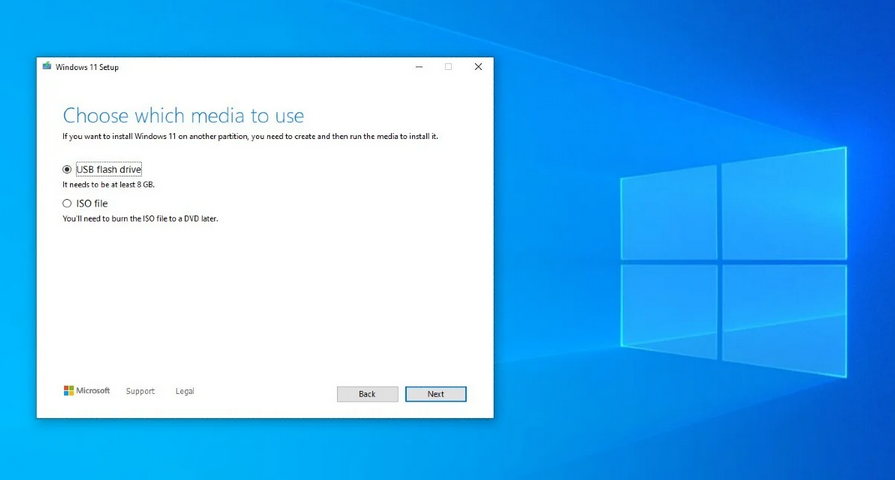
Step 5: Choosing Your Media Type (USB or ISO)
Now you’ll specify what type of installation media you want to create. The Media Creation Tool presents two options for how to package your Windows 11 download.
Option 1: USB Flash Drive
The first option reads “USB flash drive.” Selecting this option tells the tool to create a bootable USB drive directly. The entire process happens automatically – the tool downloads Windows 11, formats your USB drive, and makes it bootable in one streamlined operation.
When to choose USB flash drive:
Choose this option when you want to install Windows 11 on a computer immediately or in the near future. Bootable USB drives are the most convenient installation method for modern computers. They’re faster than DVDs, reusable, and work with computers that lack optical drives.
How to proceed with USB option:
Click the radio button next to “USB flash drive,” then click “Next.”
On the following screen, the tool displays all connected USB drives. You’ll see a list showing the drive letter, name, and size of each USB device currently plugged into your computer.
Locate your target USB drive in the list. Remember: everything on this drive will be permanently erased. Make absolutely certain you’re selecting the correct drive if you have multiple USB devices connected.
Click on your chosen USB drive to select it (it will highlight in blue), then click “Next” at the bottom of the window.
The tool immediately begins downloading Windows 11 and creating your bootable USB drive. This process is detailed in Step 6 below.
Option 2: ISO File
The second option reads “ISO file.” Selecting this creates a Windows 11 ISO file saved to your computer’s hard drive rather than creating a bootable USB immediately.
When to choose ISO file:
Choose this option if you want more flexibility with your installation media. ISO files can be burned to a DVD using disc burning software, mounted as a virtual drive for upgrades, or converted to a bootable USB drive later using tools like Rufus. ISO files are also useful for archiving or creating multiple installation media from a single download.
How to proceed with ISO option:
Click the radio button next to “ISO file,” then click “Next.”
A file browser window opens, asking where you want to save the ISO file. Navigate to your preferred location. Your Desktop, Downloads folder, or an external hard drive are common choices.
The file will be named something like Windows.iso or Win11_English_x64.iso by default. You can rename it to something more descriptive if you prefer, such as “Windows11_Home_22H2.iso” to note the specific version and edition.
Click “Save” once you’ve chosen your location and filename.
The tool immediately begins downloading Windows 11 and creating your ISO file. This process is detailed in Step 6 below.
Step 6: Downloading Windows 11
Regardless of whether you chose USB or ISO, the Media Creation Tool now begins downloading Windows 11 from Microsoft’s servers. This is the longest part of the entire process.
Monitoring the Download Progress
The tool window displays a progress screen with several indicators showing what’s happening. You’ll see:
“Downloading Windows 11” as the main status message, along with a percentage counter (0%, 15%, 47%, etc.) showing overall progress.
Below that, you’ll see the current download speed (something like “23.5 MB/s”) and an estimated time remaining (“About 12 minutes remaining”).
A blue progress bar fills from left to right as the download proceeds, providing visual feedback on completion status.
Download Duration Expectations
The Windows 11 download is approximately 5-6 GB in size. Your download time depends entirely on your internet connection speed.
On a fast fiber or cable connection (100 Mbps or higher), expect the download to complete in 10-20 minutes. On moderate broadband connections (25-50 Mbps), plan for 30-60 minutes. On slower connections, the process could take several hours.
The Media Creation Tool can resume interrupted downloads, so if your connection drops briefly, don’t panic. The tool will automatically reconnect and continue where it left off in most cases.
What’s Happening During Download
While the percentage climbs, the tool is pulling down the complete Windows 11 installation files directly from Microsoft’s Content Delivery Network. These files include the Windows operating system itself, built-in applications, drivers, and all necessary installation components.
The download happens in the background while you can continue using your computer normally. However, since it’s consuming bandwidth, other internet-dependent activities might be slower than usual. Streaming video, video calls, or online gaming could experience performance impacts during the download.
Step 7: Creating the Installation Media
Once the download reaches 100%, the Media Creation Tool transitions to the media creation phase. What happens next depends on whether you selected USB flash drive or ISO file in Step 5.
If You Selected USB Flash Drive
The status message changes to “Creating Windows 11 media.” The tool is now writing the downloaded Windows 11 files to your USB drive and making it bootable.
You’ll see a similar progress interface with percentage completion and a progress bar. This phase typically takes 10-20 minutes depending on your USB drive’s write speed and your computer’s USB port version.
What’s happening technically:
The tool formats your USB drive with the correct file system, partitions it appropriately for bootable media, writes all Windows 11 installation files to the drive, and configures boot sectors so computers can boot from the drive and launch the Windows installer.
Important: Do not remove the USB drive during this process. Interrupting the write operation will corrupt the drive and require you to start over. Wait for the tool to indicate completion before disconnecting anything.
Once finished, the status changes to “Your USB flash drive is ready” or a similar completion message.
If You Selected ISO File
The status message changes to “Creating Windows 11 media” or “Creating ISO file.” The tool is packaging all downloaded Windows 11 files into a single ISO disk image file at the location you specified.
This process typically takes 5-15 minutes depending on your computer’s processing power and hard drive speed. ISO creation is generally faster than USB creation since it’s just organizing files rather than also making bootable media.
What’s happening technically:
The tool compiles all Windows 11 installation files into an ISO file format, which is essentially a complete image of what would be on an installation DVD. The ISO includes the proper boot sectors and file structure needed for Windows installation.
Once finished, the status changes to “ISO file has been created” or shows the file path where your ISO was saved.
Step 8: Verification and Completion
After successfully creating your installation media (USB or ISO), the Media Creation Tool displays a completion screen confirming that everything finished successfully.
Understanding the Completion Screen
The completion message will say something like:
“Your USB flash drive is ready” (if you created a USB drive), or
“The ISO file has been created successfully” (if you created an ISO file)
Below this message, you’ll see the file path showing where your media was created. For USB drives, this shows the drive letter (like “E:”). For ISO files, this shows the complete path (like “C:\Users\YourName\Downloads\Windows.iso”).
The screen also displays the total size of the created media, typically around 5-6 GB.
Finishing Up
At the bottom of the completion screen, you’ll see a “Finish” button. Click this button to close the Media Creation Tool.
The tool window closes, returning you to your normal Windows desktop. The Media Creation Tool has completed its job entirely.
Verifying Your USB Drive
If you created a USB flash drive, let’s verify it was created correctly before using it.
Open File Explorer (press Windows key + E). Look in the left sidebar under “This PC” for your USB drive. It will now be labeled “ESD-USB” or “Windows 11” with a drive letter.
Click on the USB drive to view its contents. You should see several folders and files including:
- A folder named “boot”
- A folder named “efi”
- A folder named “sources”
- Files named “bootmgr” and “bootmgr.efi”
- A file named “setup.exe”
If you see these folders and files, your bootable USB was created successfully and is ready to use for Windows 11 installation.
Verifying Your ISO File
If you created an ISO file, navigate to the location where you saved it. You should see a file with an .iso extension and a size around 5-6 GB.
Right-click the ISO file and look at its properties. The size should match what the Media Creation Tool reported (approximately 5-6 GB). If the file size is drastically smaller (like a few megabytes), the creation process failed and you’ll need to try again.
You can also right-click the ISO file and select “Mount” to mount it as a virtual drive in Windows. This lets you explore its contents just like the USB verification above. You should see the same folders (boot, efi, sources) and files (setup.exe, bootmgr, etc.).
Step 9: Using Your Windows 11 Installation Media
Now that you’ve successfully created Windows 11 installation media, let’s discuss how to actually use it for installing or upgrading Windows.
Installing Windows 11 from a Bootable USB Drive
To perform a clean installation on a computer using your bootable USB:
Step 9.1: Insert your bootable USB drive into the target computer.
Step 9.2: Restart the computer completely. As it begins booting up, you need to access the boot menu or BIOS setup.
Step 9.3: Press the appropriate key repeatedly during startup to access the boot menu. The specific key varies by manufacturer:
- Dell computers: Press F12
- HP computers: Press F9 or Esc
- Lenovo computers: Press F12 or F8
- ASUS computers: Press F8 or Esc
- Acer computers: Press F12
- MSI computers: Press F11
The correct key is often displayed briefly on screen during startup (something like “Press F12 for Boot Menu”).
Step 9.4: Once the boot menu appears, use arrow keys to select your USB drive from the list of boot devices. It will be identified by its name or labeled as “USB Storage Device” or “Removable Device.”
Step 9.5: Press Enter to boot from the USB drive.
Step 9.6: The computer boots from your USB drive and launches the Windows 11 installation program. You’ll see the Windows logo and a “Loading files…” message.
Step 9.7: Follow the on-screen Windows 11 installation prompts to complete the installation process.
Using an ISO File for Upgrade Installation
To upgrade your current Windows installation using an ISO file:
Step 9.1: Navigate to where you saved your Windows 11 ISO file.
Step 9.2: Right-click the ISO file and select “Mount” from the context menu. Windows mounts the ISO as a virtual DVD drive.
Step 9.3: Open File Explorer and locate the newly mounted drive (it will appear as a new DVD drive with the Windows 11 installation files).
Step 9.4: Double-click the “setup.exe” file in the root of the mounted drive.
Step 9.5: The Windows 11 Setup program launches. Click “Next” to begin the upgrade process.
Step 9.6: Follow the on-screen prompts. The installer will check for updates, verify compatibility, and guide you through the upgrade while preserving your files and applications.
Creating Additional USB Drives from Your ISO
If you created an ISO file and later want to make bootable USB drives from it, you can do so without re-downloading Windows 11:
Step 9.1: Download a USB bootable creation tool like Rufus (free and popular) from its official website.
Step 9.2: Insert a USB drive (8 GB or larger) that you want to make bootable.
Step 9.3: Run Rufus and select your USB drive from the Device dropdown.
Step 9.4: Click the “SELECT” button and browse to your Windows 11 ISO file.
Step 9.5: Leave other settings at their defaults (Rufus automatically detects appropriate settings for Windows 11).
Step 9.6: Click “START” to create the bootable USB from your ISO file.
This lets you create multiple installation USB drives from a single ISO download, which is extremely useful for IT professionals or anyone managing multiple computers.
Best Practices and Pro Tips
Let me share some expert advice that will make your Media Creation Tool experience smoother and more successful.
Tip 1: Label Your Installation Media Clearly
Once you’ve created a bootable USB drive, physically label it with the Windows version, edition, and creation date. Use a label maker or simply write on tape applied to the USB drive.
Example: “Win11 Pro 64-bit – Jan 2026”
This prevents confusion if you have multiple Windows installation drives, and helps you know when the media might be outdated and need refreshing with newer Windows builds.
Tip 2: Create Installation Media Every Six Months
Windows 11 receives major feature updates approximately twice per year. Creating fresh installation media every six months ensures you have the latest version with all recent updates, security patches, and features.
Installation media created with older versions of Windows 11 will still work, but you’ll need to download many updates after installation. Fresh media reduces post-installation update time significantly.
Tip 3: Keep ISO Files Archived
If you have sufficient storage space, keep your Windows 11 ISO files rather than deleting them after creating USB drives. Store them on an external hard drive or network storage.
This gives you the flexibility to create additional bootable USB drives without re-downloading Windows 11, and provides a backup if you need to reinstall Windows but don’t have internet access.
Tip 4: Test Your Bootable USB Immediately
After creating a bootable USB drive, test it on a computer to verify it actually boots and launches the Windows 11 installer. This confirms the media was created successfully before you need it in an emergency situation.
You don’t need to complete the installation – just boot from the USB, verify the Windows Setup screen appears, then restart the computer normally. This five-minute test could save hours of frustration later.
Tip 5: Use High-Quality USB Drives
Not all USB drives perform equally. For bootable Windows installation media, use reputable brand USB drives (SanDisk, Kingston, Samsung, etc.) rather than cheap promotional drives.
Higher-quality drives have better reliability and faster read/write speeds, which makes the installation process quicker and reduces the chance of corruption or errors during Windows installation.
Tip 6: Keep Multiple Versions for Different Purposes
Consider creating both Windows 11 Home and Windows 11 Pro installation media if you support multiple computers with different editions. This eliminates the need to remember which edition each computer uses.
Similarly, if you support computers using different languages, create separate media for each language you commonly need.
Tip 7: Document Your Product Keys
When creating Windows 11 installation media, take the opportunity to document your Windows product keys. Create a secure spreadsheet or document with computer names and their corresponding Windows licenses.
This makes future reinstallations smoother since you’ll have all necessary licensing information readily available rather than scrambling to find product keys during a crisis.
Understanding Windows 11 Versions and Updates

Let’s clarify something that confuses many people: Windows 11 versions, builds, and how the Media Creation Tool relates to them.
Version vs. Build Numbers
Windows 11 uses a version naming system based on when feature updates are released. The original Windows 11 was version 21H2 (released in the second half of 2021). Subsequent versions include 22H2, 23H2, and future releases.
Each version contains many “builds” identified by numbers like 22000.1574 or 22621.1105. Builds are smaller updates within a version that fix bugs and add minor improvements.
When you use the Media Creation Tool, it always downloads the latest publicly available version and build of Windows 11. You don’t need to choose or specify this – Microsoft automatically provides the current release.
How Often Should You Recreate Installation Media?
As mentioned earlier, recreating installation media every six months keeps you current with major feature updates. However, if you’re about to perform an important installation, it’s worth creating fresh media immediately before, regardless of when you last created it.
The Windows 11 you download today includes months of updates compared to media created six months ago. These updates include security improvements, bug fixes, and feature enhancements that reduce post-installation update time significantly.
Will Old Installation Media Still Work?
Yes, installation media created with older Windows 11 versions continues to work indefinitely. If you use a Windows 11 21H2 USB drive created in 2021, it will still install Windows 11 successfully in 2026.
However, after installation completes, Windows Update will need to download and install every feature update and cumulative update released since that 21H2 version. This could mean downloading several gigabytes of updates, which is why fresh installation media is preferable when possible.
When to Use the Media Creation Tool vs. Other Methods
The Media Creation Tool isn’t the only way to get Windows 11, so let’s clarify when it’s the best choice versus alternative methods.
Media Creation Tool: Best For
The Media Creation Tool excels when you want a straightforward, official method to create installation media or upgrade a computer. It’s perfect for:
- Creating bootable USB drives for clean installations
- Upgrading a Windows 10 PC to Windows 11
- IT professionals preparing installation media for multiple similar computers
- Anyone who wants the official, guaranteed-safe download directly from Microsoft
- Situations where you want the complete, unmodified Windows 11 installation
Windows Update: Best For
Regular Windows Update (Settings > Windows Update) is better when:
- Your Windows 10 or Windows 11 installation works fine and you just want to update to the latest version
- You prefer the simplest possible upgrade path
- You want Windows to automatically handle compatibility checking and driver updates
- You’re upgrading multiple computers on a managed network where centralized update control is desired.
ISO Direct Download: Best For
Microsoft also offers direct ISO downloads from the Windows 11 download page (separate from the Media Creation Tool). This method is better when:
- You’re using a non-Windows computer (Mac or Linux) to download Windows 11
- You specifically want just the ISO file without the Media Creation Tool interface
- You’re experiencing technical difficulties with the Media Creation Tool and want an alternative
The functionality is similar, but the ISO direct download skips the Media Creation Tool application entirely and downloads the ISO file directly through your browser.
Maintaining Your Installation Media
Once you’ve created Windows 11 installation media, a little maintenance ensures it remains reliable and ready when you need it.
Proper Storage for USB Drives
Store your bootable USB drives in a safe location where they won’t be accidentally damaged, reformatted, or lost. Consider:
- Keeping them in a labeled case or container specifically for installation media
- Storing them separately from everyday USB drives to prevent accidental reformatting
- Keeping them in a temperature-controlled environment (not in cars or near heat sources)
- Protecting them from physical damage, moisture, and magnetic fields
Periodic Testing
Every few months, test your bootable USB drives to ensure they still function correctly. Boot a computer from the USB and verify the Windows Setup screen appears. This confirms the bootable sectors and installation files remain intact.
USB drives can develop bad sectors or corruption over time, especially cheaper drives. Periodic testing catches problems before you desperately need the drive for an emergency installation.
Updating Your Media Library
Every six months when Microsoft releases major Windows 11 updates, consider replacing your old installation media with fresh versions. Keep the old media as backup for a while before disposing of it, just in case the new version has unexpected issues.
This rotation ensures you always have current installation media while maintaining a backup version in case of problems with the newest release.
Secure Disposal of Old Media
When retiring old bootable USB drives, properly wipe them before repurposing or disposing of them. Although the drives contain only Windows installation files (not personal data), it’s good practice to format them securely.
Right-click the drive in File Explorer, select “Format,” check “Quick Format,” and click “Start.” This prepares the drive for reuse while removing all Windows installation files.
Your Path Forward with Windows 11 Installation
You’ve now learned everything necessary to confidently use the Windows 11 Media Creation Tool, from initial download through creating installation media and using it for Windows installations.
The beauty of having bootable installation media is peace of mind. Your computer might be running perfectly today, but having that USB drive ready means you’re prepared if problems arise. System corruption, hard drive failures, or major infections become manageable challenges rather than catastrophic disasters when you have installation media ready.
Take an hour this weekend to create fresh Windows 11 installation media. Label it clearly, store it safely, and test it once to verify it works. That small investment of time provides enormous value when you eventually need it – and trust me, at some point, you will.
Remember that the Media Creation Tool connects directly to Microsoft’s servers and downloads the official, unmodified Windows 11 installation files. You’re getting exactly the same Windows that Microsoft distributes to computer manufacturers and enterprise customers. There’s no safer, more reliable source for Windows installation media.
Whether you’re a home user preparing for potential computer problems, an IT professional supporting multiple machines, or a tech enthusiast who enjoys having the latest tools available, the Media Creation Tool serves you well. Use it wisely, maintain your installation media properly, and you’ll always be prepared for whatever Windows challenges come your way.
Frequently Asked Questions
What is the Windows 11 Media Creation Tool used for?
The Windows 11 Media Creation Tool is an official Microsoft utility used to download Windows 11 and create installation media. It is commonly used to upgrade an existing PC, reinstall Windows, or make a bootable USB drive for installing Windows on another computer.
Do I need a USB drive to use the Media Creation Tool?
Not always. You can use the tool to upgrade the current PC without a USB drive. However, if you want to install Windows 11 on another computer or perform a clean installation, you will need a USB drive with at least 8 GB of storage.
Will the Media Creation Tool delete my files?
It depends on how you use it. If you choose the upgrade option, you can usually keep your personal files and apps. If you use it to perform a clean installation from a bootable USB, your existing data on that drive can be erased, so backing up important files is strongly recommended.
Why is the Windows 11 Media Creation Tool not working on my PC?
Common reasons include unsupported hardware, unstable internet connection, insufficient storage space, or corrupted system files. Making sure your PC meets Windows 11 system requirements and running the tool as administrator often fixes many issues.